Packets are a tool for communicating between the client and server. They can be client-bound, (the packet is only sent from the server to client), server-bound (the packet is only sent from client to server) or unidirectional. They can carry any arbitrary data that you can fit into its Data Stream.
StationAPI also provides a MessagePacket, which despite its name can also be used for any arbitrary data, including serialized objects.
Creating a Custom Packet
To create a custom packet you first need to extend the Packet class and implement the ManagedPacket interface, into the generic type between < > put in the type of your packet class, like this:
public class ExamplePacket extends Packet implements ManagedPacket<ExamplePacket> {

}
IntelliJ will now prompt you to implement the Packet methods and the ManagedPacket method.
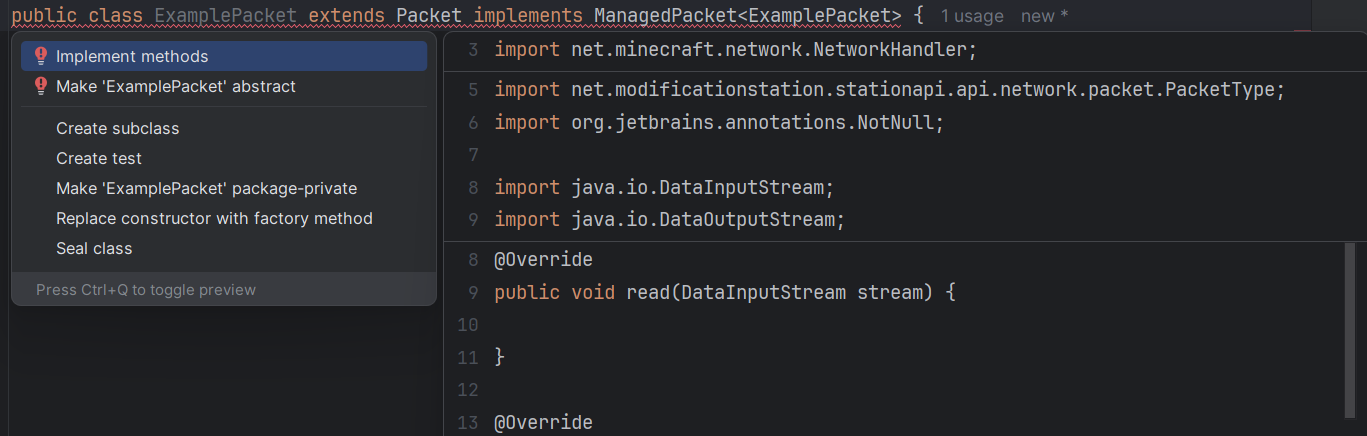
In this context menu, click on Implement Methods
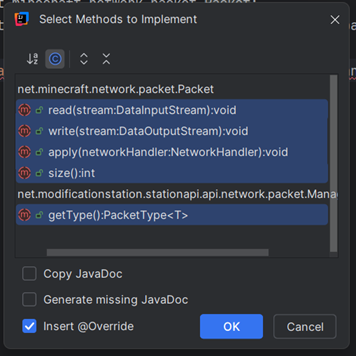
Make sure all methods are selected and hit OK. This will result in the methods getting implemented with some default implementation.
Following this also create an empty constructor with no arguments, like this:
public ExamplePacket() {
}
Then we will build our PacketType, this will tell the game whether the packet is client-bound/server-bound or unidirectional. At the top of your class, outside of any methods, create a public static final PacketType that will hold our type, and use the PacketType.builder to build the packet.
public static final PacketType<ExamplePacket> TYPE = PacketType.builder(true, true, ExamplePacket::new).build();The arguments are as follows:
- clientBound - Whether this packet will be sent from server to client
- serverBound - Whether this packet will be sent from client to server
- factory - The method that constructs this packet
Now you will want to return this TYPE in the getType method that was implemented before and currently returns null.
@Override
public @NotNull PacketType<ExamplePacket> getType() {
    return TYPE;
}
Registering the Packet
Now we need to register the packet, to do this, we will create a new event listener that will listen to the PacketRegisterEvent and register the class as an entrypoint, to learn more about how to do that, head to Entrypoints & Events.
public class PacketListener {
    @Entrypoint.Namespace
    public static Namespace NAMESPACE;

    @EventListener
    public void registerPackets(PacketRegisterEvent event) {
        Registry.register(PacketTypeRegistry.INSTANCE, NAMESPACE.id("example"), ExamplePacket.TYPE);
    }
}
The
Registry.registeris unfortunately required for now, in future you will be able to use event.register as with every other event
The first parameter will always be PacketTypeRegistry.INSTANCE, this is what tells the Registry.register method into which registry we are registering.
The second parameter will be the Identifier of your packet, this can be anything you like.
The third parameter is the type of the packet, you need to return the public static final PacketType that you’ve created in the packet class previously
Packet short-circuiting
Before we actually add data to the packet, let’s talk about packet short-circuiting, this allows you to greatly simplify your logic as you can handle the packet in singleplayer and multiplayer in a same way.
This is done by allowing you to send the packet in singleplayer, but instead of sending it to a server, it gets directly sent to the packet handler on the client and calling the apply method.
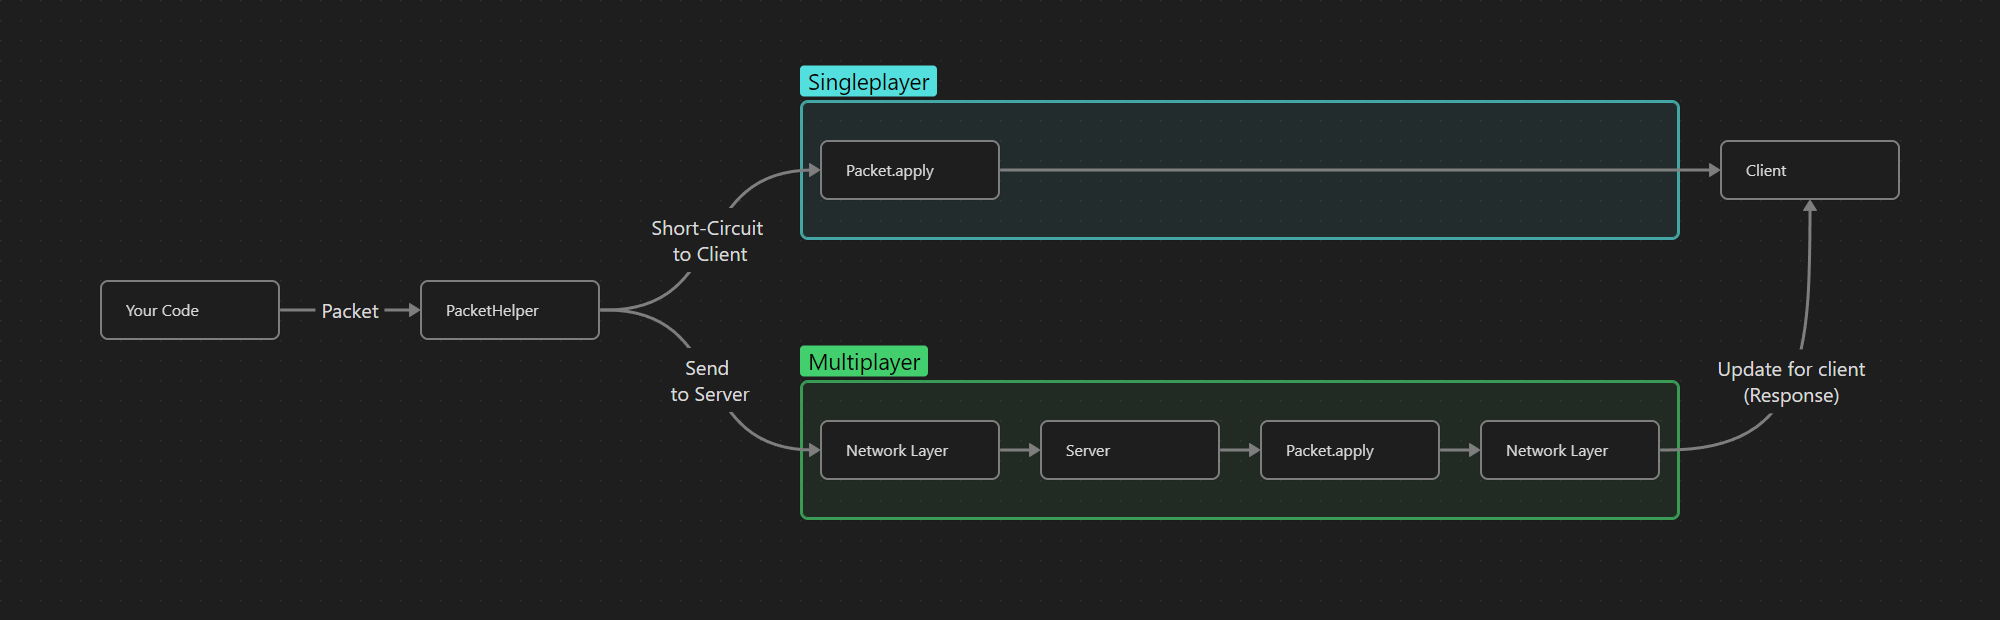
On the below picture you can see a rough visualization of the different paths that the packet will take in either singleplayer or multiplayer.
-
In the case of multiplayer, the packet gets sent thru the network layer to the server, the packet is then processed on the server in the
Packet.applymethod. The server will then determine if the client needs to be updated on what happened on the server, for example if a block has been changed, and if yes, send the appropriate update packets to the client which will process them. -
In the case of singleplayer, the packet gets immediately sent into the
Packet.applymethod. No further updates are necessary since everything is happening on the client.
Adding data to the Packet
Now that we created our packet and registered it, we can start adding data to it. We will do this by adding fields to the class with the values we wanna transfer. However keep in mind that we need to keep track of how large our packet is, below is a table of how many bytes each of the common data types will use up.
| Data Type | Size | Write Method | Read Method |
|---|---|---|---|
| boolean | 1 byte | stream.writeBoolean | stream.readBoolean |
| char | 2 bytes | stream.writeChar | stream.readChat |
| byte | 1 byte | stream.writeByte | stream.readByte |
| short | 2 bytes | stream.writeShort | stream.readShort |
| int | 4 bytes | stream.writeInt | stream.readInt |
| long | 8 bytes | stream.writeLong | stream.readLong |
| float | 4 bytes | stream.writeFloat | stream.readFloat |
| double | 8 bytes | stream.writeDouble | stream.readDouble |
| String | String.length | stream.writeUTF | stream.readUTF |
At this point your packet class should be created, registered and ready for us to use to transfer some data. It should look something like this:
public class ExamplePacket extends Packet implements ManagedPacket<ExamplePacket> {
    public static final PacketType<ExamplePacket> TYPE = PacketType.builder(true, true, ExamplePacket::new).build();

    public ExamplePacket() {
    }

    @Override
    public void read(DataInputStream stream) {

    }

    @Override
    public void write(DataOutputStream stream) {

    }

    @Override
    public void apply(NetworkHandler networkHandler) {

    }

    @Override
    public int size() {
        return 0;
    }

    @Override
    public @NotNull PacketType<ExamplePacket> getType() {
        return TYPE;
    }
}
Let’s quickly go through what these methods we have implemented in the step Creating a Custom Packet actually do:
void read(DataInputStream stream) - this will be called when the packet is received and its contents need to be read from the network stream
write(DataOutputStream stream) - this will be called when the packet is being sent and needs to be written to the network stream
void apply(NetworkHandler networkHandler) - this will be called after the packet has been read from the stream using the read method, or when it has been short-circuited in singleplayer
int size() - this will be called after the packet has been written, you need to return the size of the packet here
Writing and reading the data
First start off by adding a field to the class itself that will contain the values you want to send, for the purposes of this demonstration I will be sending over 3 ints and a String.
After that, write the values in the write method and read them in the read method, in the same order.
(Some of the parts of the packet class will be omitted for more clarity during this section)
public class ExamplePacket extends Packet implements ManagedPacket<ExamplePacket> {
	// The fields we are gonna be transferring over the network
    public int x;
    public int y;
    public int z;
    public String message;

	// This is required so the packet can be constructed when received
    public ExamplePacket() {
    }

	// This is how we are gonna initialize the packet before sending it
    public ExamplePacket(int x, int y, int z, String message) {
        this.x = x;
        this.y = y;
        this.z = z;
        this.message = message;
    }

	// This will be called when the packet is received
    @Override
    public void read(DataInputStream stream) {
        try {
            x = stream.readInt();
            y = stream.readInt();
            z = stream.readInt();
            message = stream.readUTF();
        } catch (IOException e) {
            throw new RuntimeException(e);
        }

    }

	// This will be called when the packet is being sent
    @Override
    public void write(DataOutputStream stream) {
        try {
            stream.writeInt(x);
            stream.writeInt(y);
            stream.writeInt(z);
            stream.writeUTF(message);
        } catch (IOException e) {
            throw new RuntimeException(e);
        }
    }

	// This will be called after the packet has been written
    @Override
    public int size() {
        return 12 + message.length(); // 4(int) + 4(int) + 4(int) + String Length
    }
}
You need to make sure that the write and read methods are symmetrical = the values are being read in the same order as they have been written
Applying the packet
Now we will tackle actually processing the packet, we will need to account for both cases that can happen (the packet being received on server & the packet being short-circuit on the client).
(Some of the parts of the packet class will be omitted for more clarity during this section)
public class ExamplePacket extends Packet implements ManagedPacket<ExamplePacket> {
    // The fields we are gonna be transferring over the network
    public int x;
    public int y;
    public int z;
    public String message;

	// This gets ran on both sides, we use SideUtil to run the versions for client and the server
    @Override
    public void apply(NetworkHandler networkHandler) {
        SideUtil.run(() -> handleClient(networkHandler), () -> handleServer(networkHandler));
        System.out.println("Message from the client: " + message);
    }

	// This will run on client
    @Environment(EnvType.CLIENT)
    public void handleClient(NetworkHandler networkHandler) {
        PlayerEntity player = PlayerHelper.getPlayerFromPacketHandler(networkHandler);
        World world = player.world;

        world.setBlockStateWithNotify(x, y, z, States.AIR.get());
        player.sendMessage("Block removed. Hello from Client");
    }

	// This will run on server
    @Environment(EnvType.SERVER)
    public void handleServer(NetworkHandler networkHandler) {
        PlayerEntity player = PlayerHelper.getPlayerFromPacketHandler(networkHandler);
        World world = player.world;

        world.setBlockStateWithNotify(x, y, z, States.AIR.get());
        player.sendMessage("Block removed. Hello from Server");
    }
}
Since the apply method gets ran on both sides, we cannot reference any side specific classes, that is why we split the handling into client and server methods. This can be very easily done with SideUtil, which will automatically run the methods for their respective sides. Those methods are also annotated for their respective sides so they do not exist in the wrong environment.
While this could be technically all done in the
applymethod using the same logic, this example is more focused on showing how to do handling on the respective sides for the cases where it is needed.
In both of the methods we use PlayerHelper.getPlayerFromPacketHandler because the player fields in the network handler are private, this method will obtain the fields using Accessors and return them back to us, from the PlayerEntity we can then get the world field.
Sending the packet
Now that we have a way to handle the packet, we just need to send it from the client. I have chosen to do this in the ExampleItem by overriding the Item.useOnBlock method and if the player is sneaking, the packet will get sent.
public class ExampleItem extends TemplateItem {
    public ExampleItem(Identifier identifier) {
        super(identifier);
    }

    @Override
    public boolean useOnBlock(ItemStack stack, PlayerEntity user, World world, int x, int y, int z, int side) {
        if (FabricLoader.getInstance().getEnvironmentType() == EnvType.CLIENT) {
            if (user.isSneaking()) {
                PacketHelper.send(new ExamplePacket(x, y, z, "This is a message sent from client"));
            }
        }

        return super.useOnBlock(stack, user, world, x, y, z, side);
    }
}
Let’s run through this code.
We first check if we are on the client, since we always only want to send this from the client. If we did not do this, this code would also run on the server.
After this we check if the player is sneaking.
If both of these conditions are true, we use PacketHelper.send to send the Packet, this packet then gets processed as described in Packet short-circuiting.
The Result
We can now verify that the packet is acting like we want it to.
Singleplayer
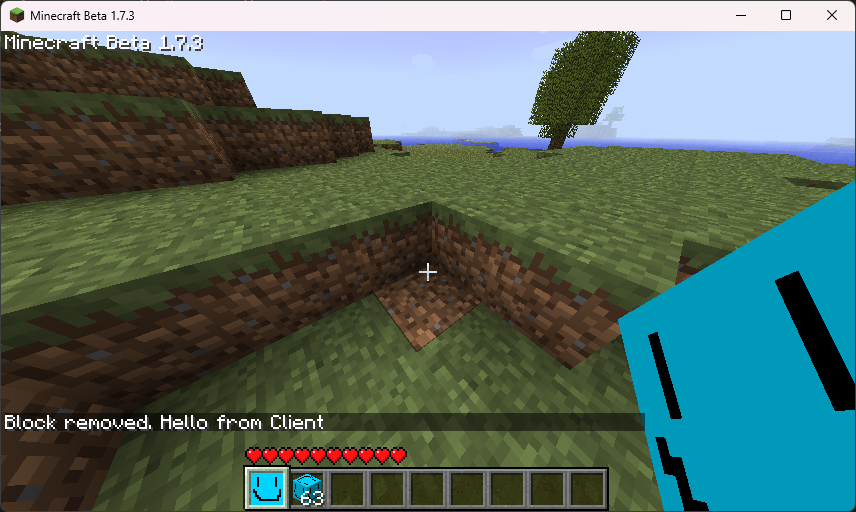
Client Game Window:
Client Console:

We can see that the player receives a message from the Client about the block being removed, and the String that we sent with the packet is displayed in the Client Console.
Multiplayer
Client Game Window:
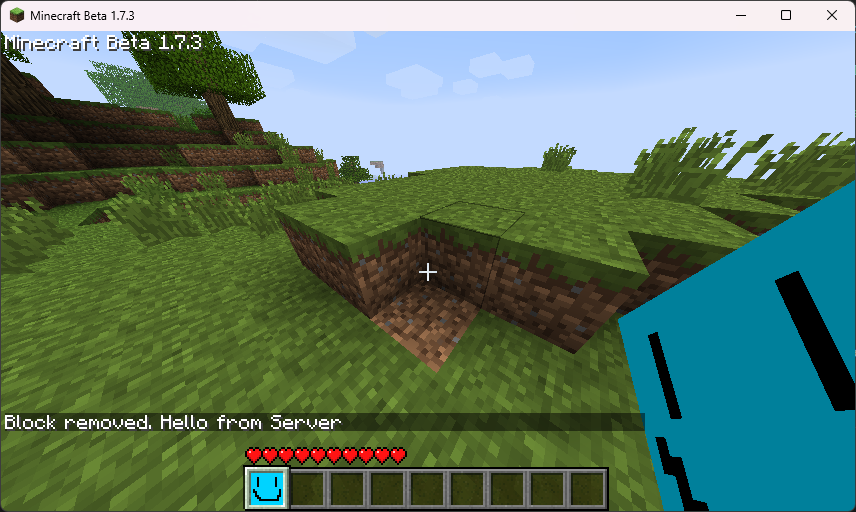
Server Console:

We can see that the player receives a message from the Server about the block being removed, and this time the String that we sent is displayed in the Server Console.